Salads
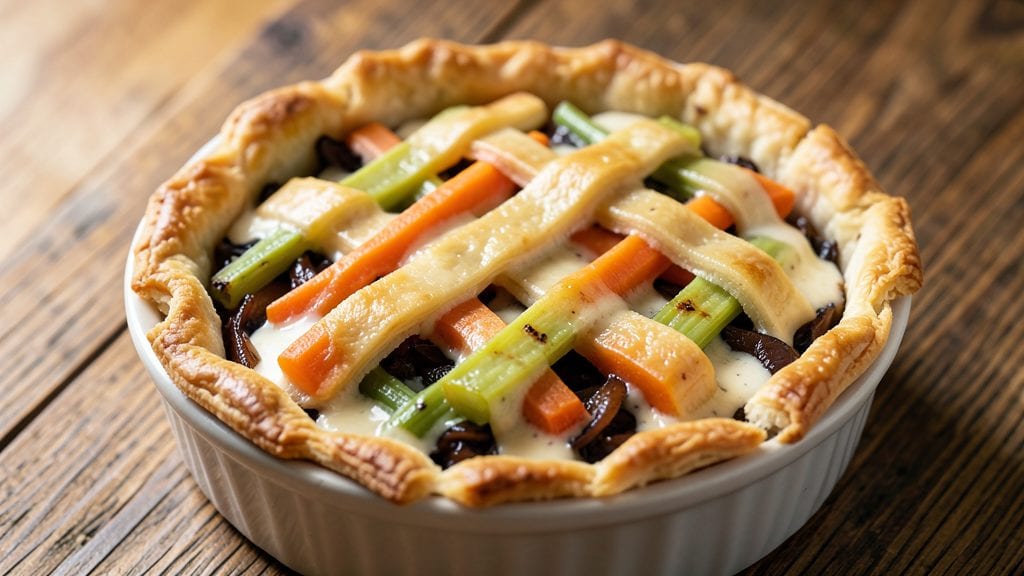
Creating individual vegetable pot pies transforms weeknight dinners into comforting, single-serving meals without the fuss of a full casserole. The secret lies in balancing tender vegetables with a golden, flaky crust—each bite delivers that restaurant-style warmth in a fraction of the time.
I developed this recipe after testing countless variations, ensuring every component works together perfectly for maximum flavor and ease.
This method uses a simple store-bought crust (or homemade if you prefer) paired with a savory filling of seasonal vegetables, herbs, and a creamy sauce that locks in moisture.
The beauty of individual pies is that you can customize each one—swap vegetables based on what’s fresh, or adjust the seasoning to taste. With just 30 minutes of prep and 25 minutes in the oven, you’ll have dinner on the table without the cleanup of a full pot pie.
The result is a golden, crisp-edged pot pie with a tender filling that’s rich yet light, thanks to the right balance of dairy and herbs. The crust stays flaky and buttery, while the vegetables soften just enough to melt in your mouth.
It’s the kind of dish that feels indulgent but is actually simple enough for any night—perfect for when you want comfort without the effort.
Serve these with a side salad or crusty bread to soak up any extra filling. The recipe scales easily, so you can make a batch for meal prep or just one when you’re craving that cozy, one-bite-at-a-time satisfaction. Let’s get started!
Ingredients for individual vegetable pot pie
Pantry staples meet seasonal produce—nothing fancy, just cozy comfort in bite-sized portions.
| Ingredient | Amount | Notes |
|---|---|---|
| Store-Bought Pie Crust 🍞 | 1 sheet | Thawed if frozen, rolled to 1/8-inch thickness |
| Heavy Cream 🥛 | ½ cup | Full-fat for creaminess, cold from fridge |
| Whole Milk 🥛 | ¼ cup | Warmed to room temperature |
| Yellow Onion 🧅 | 1 whole | Medium, finely diced |
| Carrots 🥕 | 1 ½ cups | Baby carrots or diced, peeled |
| Celery Stalks 🌿 | 2 whole | Trimmed, finely chopped |
| Garlic Cloves 🧄 | 3 cloves | Peeled, minced |
| Red Bell Pepper 🍅 | 1 whole | Medium, diced, seeds removed |
| Frozen Peas 🌱 | ½ cup | Thawed, no need to drain |
| Chicken-Free Vegetable Broth 💧 | ¾ cup | Low-sodium preferred |
| All-Purpose Flour 🌾 | 1 tbsp | For thickening sauce |
| Fresh Thyme Leaves 🌿 | ½ tsp | Or 0.25 tsp dried thyme |
| Fresh Parsley 🌿 | ¼ cup | Chopped, for garnish |
| Salt 🧂 | ¾ tsp | Diamond Crystal kosher salt |
| Black Pepper 🌶️ | ½ tsp | Freshly cracked |
| Nutritional Yeast 🧀 | 1 tbsp | For umami depth, optional |
The crust is your golden ticket here. Puff Pastry from Trader Joe's or Whole Foods gives that flaky magic with zero fuss, but homemade pie dough works too if you're feeling ambitious. I always grab the pre-rolled kind—saves time and keeps the edges crisp. For the vegetables, freshness matters most. Carrots should snap when broken, celery should be crisp with no brown spots, and bell peppers should be firm. If you're short on time, frozen peas and corn work perfectly—they thaw right in the filling. The key is balancing textures: tender carrots, crisp celery, and sweet bell peppers. Don't skip the nutritional yeast—it adds that savory depth that makes these feel restaurant-worthy.
No thyme? Fresh rosemary or sage works in a pinch, but cut the amount by half. Out of bell pepper? Zucchini or mushrooms bring a different but delicious twist. The vegetable broth can be swapped for white wine or extra milk for a richer filling, but broth keeps it light. For the crust, if you can't find puff pastry, store-bought pie crust or even shortcrust dough will work—just brush with egg wash for shine. The filling reheats beautifully, so if you're prepping ahead, assemble and freeze uncooked pies on a tray before baking. They'll keep for 3 months** in the freezer—just bake straight from frozen, adding 5-7 minutes to the time.
These pies are best served fresh from the oven when the crust is golden and the filling is bubbly. If you're making a batch for meal prep, cool completely, then refrigerate in airtight containers for up to 4 days. Reheat in the oven at 375°F for 10-12 minutes to restore that crispy edge. The filling thickens as it cools, so a splash of milk or broth when reheating keeps it creamy. For extra flair, brush the crust with egg wash or melted butter before baking—it makes all the difference. Leftovers? They’re even better the next day, so plan accordingly.
Why You'll Love This Recipe
- Here’s what sold me: these little pies reheat perfectly for school lunches or office dinners. My kid’s been known to trade snacks for one of these—no questions asked. (Yes, even on a Tuesday night when they’d rather have goldfish.)
- No Chopping Chaos: I swear by this recipe because you can use pre-diced veggies—just toss in whatever you have on hand. The onions caramelize beautifully while the carrots stay tender, and honestly? That’s half the battle won before you even preheat the oven.
- Creamy Without Effort: Between us, heavy cream and whole milk make this filling ridiculously smooth—no lumps, no fuss. The golden crust seals in that velvety goodness, and that crispy edge? It’s the kind of detail that makes you pause mid-bite and go, “Damn, that’s good.”
- Lunchbox Magic: Here’s what sold me: these little pies reheat perfectly for school lunches or office dinners. My kid’s been known to trade snacks for one of these—no questions asked. (Yes, even on a Tuesday night when they’d rather have goldfish.)
Step-by-step instructions for individual vegetable pot pies
Here's how to assemble these cozy, handheld pies with flaky crust and savory filling.
Sauté the Vegetable Base
In a large skillet, heat a thin layer of oil over medium heat. Add the 1 whole yellow onion, 1.5 cups carrots, and 2 whole celery stalks, cooking for 5-6 minutes until the onions turn translucent and the vegetables begin to soften. I like to stir occasionally to ensure even cooking.
Add the 3 cloves garlic and 1 whole red bell pepper, cooking for another 3-4 minutes until the garlic is fragrant and the peppers lose their raw bite. The vegetables should be tender but still hold their shape—this prevents a mushy filling later. Season with 0.5 tsp salt and 0.5 tsp black pepper as you go.
Build the Creamy Filling
Stir in the 0.5 cup frozen peas, 0.75 cup chicken-free vegetable broth, and 0.5 tsp fresh thyme leaves. Bring the mixture to a gentle simmer, then reduce heat to low and let it cook for 5 minutes until the broth mostly evaporates and the vegetables are fully tender.
In a small bowl, whisk together the 0.5 cup heavy cream, 0.25 cup whole milk, 1 tbsp all-purpose flour, and 1 tbsp nutritional yeast until smooth. Slowly pour this mixture into the skillet, stirring constantly for 2-3 minutes until it thickens into a velvety sauce. The filling should coat the back of a spoon—this ensures a rich, cohesive texture when baked.
Assemble the Mini Pies
Preheat your oven to 375°F. Unroll the 1 sheet store-bought pie crust and cut it into 4 equal squares (about 4x4 inches each). Press each square into a 4-inch round using your fingers or a rolling pin, then place them in a muffin tin to form the bottom crusts.
Spoon ¼ of the vegetable filling into each crust-lined muffin cup, pressing down gently to create a smooth surface. This ensures even baking and prevents spillage. The filling should be level with the edges of the muffin tin—no overfilling, or the pies will overflow.
Seal and Bake to Golden Perfection
Cut the remaining pie crust into 4 more squares and place one over each filled muffin cup. Press the edges firmly with your fingers or a fork to seal, creating a decorative crimp. Brush the tops with a little whole milk for extra shine and golden color.
Bake for 25-30 minutes until the crusts are deep golden brown and the filling is bubbling. The pies are done when the crust is crisp and the filling reaches 160°F internally. Let them cool for 5 minutes before removing from the tin—this prevents the crust from breaking.
Garnish and Serve Warm
Transfer the mini pies to a serving platter and sprinkle each with 1 tbsp chopped fresh parsley. The parsley adds a bright contrast to the rich, savory filling and makes them look restaurant-worthy. Serve warm with a side of crusty bread or a simple green salad for a complete meal.
These individual pot pies are perfect for meal prep—store them in an airtight container for up to 3 days or freeze for 2 months. Reheat in the oven at 350°F for 10-12 minutes to restore their crispy texture. Enjoy the cozy comfort of homemade pot pie, one bite at a time!
Pro Tips For Making Individual Vegetable Pot Pie
- Sweat the Onion First: I learned this the hard way—raw onion in your filling makes the whole dish taste bitter. Slice that onion thin, toss it in a dry pan over medium heat, and let it cook for 3-4 minutes until it’s soft and just starting to caramelize. That’s when it stops being a harsh, sharp flavor and turns into the sweet, mellow base your veggies need.
- Pre-Cook the Carrots: Does it look weird? Yes. Does it work? Every single time. Instead of tossing raw carrots into your cream sauce, give them a quick blanch in boiling water for 3-4 minutes first. Then shock them in ice water. They’ll soften perfectly in the oven, and you’ll avoid that rubbery texture that ruins pot pies faster than undercooked crust.
- Brush the Crust Twice: That store-bought crust is your shortcut, but don’t treat it like it’s foolproof. After you’ve crimped the edges, brush the top with a mix of melted butter and a splash of milk (about 1 tablespoon each). Then, once it’s been baking for 15 minutes, brush it again—this time with just a little more milk. You’ll get a golden, flaky top instead of a sad, pale one.
- Save the Cream Sauce: Here’s where most people mess up: the sauce. After you’ve simmered your heavy cream and milk with the veggies, taste it. If it’s too thin, let it reduce for another 2-3 minutes—no stirring, just let it bubble gently. If it’s too thick, stir in a splash of warm milk or even a little water. You want it to coat the back of a spoon, not be gluey or watery.
Perfect pairings for these flavors
Side Dish Harmony
A simple arugula salad with lemon vinaigrette cuts through the richness beautifully. Toss 4 cups baby arugula with 2 tbsp extra-virgin olive oil and 1 tbsp fresh lemon juice, then top with ¼ cup shaved Parmesan. The peppery bite balances the creamy filling perfectly. 🥗
Bread Pairings
Serve with crusty sourdough bread or baguette slices for dipping. I love toasting the bread until golden and brushing it with garlic-infused olive oil before serving. The crispy crust soaks up any extra filling without overpowering the delicate flavors.
For a heartier option, try rosemary focaccia—its aromatic herbs complement the thyme in the pot pie.
Wine Pairings
A crisp Sauvignon Blanc from New Zealand shines with these pot pies. Its citrus notes and herbal undertones mirror the thyme and bell pepper in the filling. For red wine lovers, a Pinot Noir with its light body and earthy tones works beautifully.
Avoid heavy, oaky wines—they’ll clash with the delicate crust and creamy filling. 🍷
Beer Options
A Belgian witbier like Hoegaarden adds a refreshing contrast with its citrus and coriander notes. For a lighter option, try a pilsner—its crisp, clean finish balances the richness of the pot pie.
Avoid heavy IPAs or stouts, which can overpower the dish. If you prefer craft beer, a German hefeweizen with its banana and clove notes pairs surprisingly well. 🍺
Cheese Board Add-On
Turn your pot pies into a full meal by adding a small cheese board with complementary options. Include aged cheddar, brie, and goat cheese for variety. The sharpness of cheddar cuts through the creaminess, while brie adds another layer of richness.
Add cured meats like prosciutto or salami if you’re serving to meat-eaters, but keep it vegetarian with marinated olives and pickled vegetables for contrast.
Dessert Contrast
End the meal with something light to balance the richness. A lemon sorbet or vanilla bean ice cream cleanses the palate beautifully. For a no-bake option, try chocolate-dipped strawberries—the tartness and sweetness provide a perfect finish.
If you want to keep it warm, a warm spiced apple compote with vanilla ice cream adds a cozy touch that ties back to the comfort of the pot pies. 🍓
Nutrition facts
Frequently asked questions
Can I make these mini pot pies without a muffin tin?
Use 4-inch round ramekins or even small oven-safe bowls. The key is to keep the filling level with the rim to prevent overflow. Grease your alternative containers well for easy removal. For a rustic look, try individual phyllo cups—just press them into mini muffin cups before filling.
How do I adjust the recipe for fewer or more servings?
For 2 servings, halve all ingredients and use half a sheet of pie crust. For 6+ servings, double the recipe and use a 12-cup muffin tin. Keep portions consistent—each pie should hold about ½ cup filling for perfect baking. The crust-to-filling ratio is critical for that signature flaky texture.
Why did my crust turn soggy instead of crispy?
Soggy crusts usually mean one of two things: either the filling was too wet (reduce broth by 2 tbsp) or the crust wasn't pre-baked. For extra insurance, blind-bake the bottom crusts for 5 minutes at 375°F before adding filling. Also ensure your crust is fully thawed if frozen—ice crystals can steam the crust.
Can I make these ahead and freeze them?
Yes! Assemble the pies (unbaked) on a parchment-lined tray, cover with plastic wrap, and freeze for up to 3 months. Bake straight from frozen, adding 5-7 extra minutes to the time. For reheating, wrap cooled pies in foil and warm at 350°F for 10-12 minutes to restore crispiness. The filling freezes beautifully!
What vegetables can I substitute if I don't have carrots or celery?
Swap carrots for sweet potatoes or butternut squash (diced small) and celery for leeks or fennel. For extra heartiness, add mushrooms or spinach. The key is maintaining a balance of textures—keep at least 1 firm vegetable (like bell pepper) and 1 soft one (like peas or corn) in each pie for perfect mouthfeel.