Breakfast & Brunch
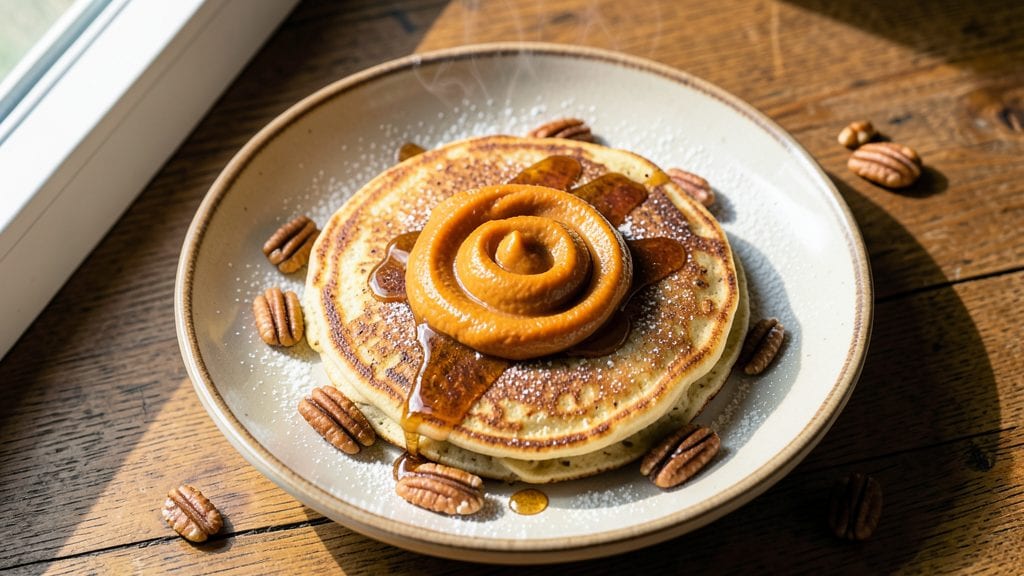
This pumpkin pie pancake recipe transforms your breakfast into a dessert-like masterpiece with every fluffy bite. The secret lies in blending pumpkin puree with warm spices—cinnamon, nutmeg, and ginger—to create pancakes that taste like a cozy autumn pie.
I perfected this recipe after years of experimenting with spiced batters, ensuring the texture stays light and airy while delivering rich, comforting flavors. The swirls of spiced batter create layers of flavor that make each bite feel like a little celebration.
What sets these pancakes apart is their perfect balance of moisture and structure—no dry, dense pancakes here. The recipe uses a simple combination of flour, baking powder, and a touch of cornstarch for that signature fluffiness, while the pumpkin adds natural sweetness without needing extra sugar.
You’ll need just 10 minutes of active prep time, followed by 3-4 minutes per side of cooking, making it ideal for weekend breakfasts or special occasions. The aroma alone will fill your kitchen with the scent of pumpkin pie, turning an ordinary morning into something extraordinary.
By the time you’re done, you’ll have a stack of golden pancakes with tender, spiced layers that practically melt in your mouth. Top them with whipped cream, a drizzle of maple syrup, or even a sprinkle of cinnamon sugar for that final touch of indulgence.
These pancakes are hearty enough to satisfy a crowd but light enough to feel special—perfect for brunch, a weekend treat, or a comforting breakfast when you crave something warm and familiar.
The best part? This recipe scales effortlessly, so you can make a single serving or double the batch for leftovers. Store them in the fridge and reheat in a toaster for a quick, delicious breakfast all week long.
Whether you’re hosting a fall gathering or simply treating yourself, these pumpkin pie pancakes deliver the cozy, spiced flavors you love—without the fuss of baking a pie.
Ingredients for pumpkin pie pancake
Sixteen ingredients for pancakes that taste like autumn pie—no one will believe they're breakfast.
| Ingredient | Amount | Notes |
|---|---|---|
| All-Purpose Flour 🌾 | 1 ½ cups | Sifted for fluffiness |
| Granulated Sugar 🍚 | ½ cup | Light brown sugar optional |
| Canned Pumpkin Puree 🎃 | 1 cup | Unsweetened, 100% pumpkin |
| Baking Powder 🍞 | 2 tsp | Aluminum-free preferred |
| Cornstarch 🌾 | 2 tbsp | For extra fluffiness |
| Ground Cinnamon 🌿 | 2 tsp | Freshly ground preferred |
| Ground Nutmeg 🌿 | ½ tsp | Freshly grated nutmeg better |
| Ground Ginger 🌶️ | 1 tsp | Fresh ginger powdered |
| Salt 🧂 | ½ tsp | Fine sea salt preferred |
| Large Eggs 🥚 | 2 whole | Room temperature preferred |
| Unsalted Butter 🧈 | ½ cup | Melted, full-fat preferred |
| Milk 🥛 | 1 ¼ cups | Whole milk for richness |
| Vanilla Extract 🍯 | 1 tbsp | Pure vanilla extract |
| Maple Syrup 🍁 | ¼ cup | For swirls and serving |
| Whipped Cream 🍦 | ½ cup | Homemade or store-bought |
The pumpkin puree is non-negotiable here—Libby's unsweetened is my go-to, but any 100% pumpkin works. The spices? Penzeys or local spice shops have the freshest ground cinnamon and nutmeg, but your grocery store's bulk bins are fine if they're labeled recent. I always toast the cinnamon and nutmeg in a dry pan for 30 seconds to wake up their flavors—game-changer. The cornstarch might seem odd, but trust me, it's what keeps these pancakes light and fluffy instead of dense. And the butter? Plugrá or Land O'Lakes are my favorites for that rich, creamy melt.
No pumpkin puree? Roasted pumpkin puréed works perfectly—just scoop out the flesh of a sugar pumpkin, roast at 400°F for 45 minutes, then blend until smooth. Short on milk? Oat milk or half-and-half keeps the richness. The maple syrup swirls can be swapped for caramel sauce or chocolate chips if you're feeling wild. Want extra fluff? Add 1/4 tsp baking soda but cut the baking powder to 1.5 tsp. And if you're making a big batch, I swear by double the batter in a single pan—just fold in extra milk to thin it out slightly.
These pancakes reheat like a dream—toaster or skillet over medium-low for 1-2 minutes until crispy again. Store leftovers in an airtight container for 3 days or freeze between parchment paper for up to 3 months. Pro tip: freeze them flat in a single layer, then stack with parchment between each pancake. The whipped cream? Homemade is best—just whip heavy cream with a pinch of vanilla and powdered sugar—but store-bought in a squeeze bottle works in a pinch. Serve with extra cinnamon sugar or a drizzle of maple syrup for that final touch.
Why You'll Love This Recipe
- Pantry Magic: I swear by this recipe when my fridge is bare—just flour, sugar, and that can of pumpkin puree sitting in my pantry. No fresh ingredients, no fancy tools, just a bowl and a spatula. Honestly, it’s my "I forgot to grocery shop" lifesaver.
- Spiced Comfort: That first bite of warm, spiced pumpkin with the fluffy texture? It’s like dessert for breakfast. The cornstarch gives them just the right lift, while the baking powder keeps them light—no dense, heavy pancakes here.
- Breakfast or Brunch: Serve them with maple syrup for a lazy weekend brunch, or swap in whipped cream and cinnamon for a fall-themed dessert. My kids ask for these at school events, and honestly? They’re just as happy at 8 AM as they are at 8 PM.
- No Waste, All Win: A batch makes six pancakes, and they reheat like a dream. I’ve frozen them too—just toss a couple in the toaster, and it’s like they’re fresh. Between us, this recipe is my secret weapon for using up pumpkin puree before it expires.
Step-by-step instructions for pumpkin pie pancakes
Here's how to create fluffy, spiced layers with a perfect pumpkin swirl—no pie pan required!
Mix the Dry Ingredients for Maximum Fluff
In a large mixing bowl, combine the 1.5 cups all-purpose flour, 2 tsp baking powder, 2 tbsp cornstarch, 2 tsp ground cinnamon, 0.5 tsp ground nutmeg, 1 tsp ground ginger, and 0.5 tsp salt. Sift the flour mixture twice for a light, airy texture—this prevents dense pancakes. I like to use a whisk to break up any lumps, ensuring everything is evenly distributed before adding liquids.
This step is crucial for achieving that signature fluffy, cloud-like pancake texture. The cornstarch acts as a thickening agent while keeping the pancakes tender, and the spices create that warm, comforting pumpkin pie flavor right in your stack. Don't skip the sifting—those lumps will make your pancakes tough instead of light and airy.
Whisk Wet Ingredients for a Silky Batter
In a separate bowl, melt the 0.5 cup unsalted butter over low heat until completely liquid, then let it cool slightly. Add the 1 cup canned pumpkin puree, 1.25 cups milk, 2 whole large eggs, and 1 tbsp vanilla extract, then whisk vigorously for 2-3 minutes until fully combined and slightly thickened. The mixture should be smooth with no visible streaks of egg white.
Here's the thing—room temperature eggs incorporate better, but if yours are cold, don't worry. Just whisk a bit longer until the batter feels uniformly thick. This step ensures your pancakes won't be gummy or undercooked in the center. The pumpkin puree adds natural sweetness and moisture, while the melted butter creates that perfect golden-brown crust we all love.
Combine Wet and Dry Ingredients Gently
Gradually pour the wet ingredients into the dry ingredients while gently folding with a spatula. Mix just until combined—you should still see some flour streaks. Overmixing develops gluten, which makes pancakes tough. The batter should be thick but pourable, like heavy cream. If it's too thick, add 1-2 tablespoons of milk to reach the right consistency.
This is where the magic happens. The gentle folding preserves those air pockets created by the baking powder, giving you pancakes with height and a tender crumb. I like to scrape the bottom of the bowl to ensure no dry flour remains. The batter should coat the back of your spatula smoothly but still hold its shape when you lift it.
Create the Signature Swirl Pattern
Divide the batter evenly between two bowls. To one bowl, add the 0.25 cup maple syrup. Stir it in just until combined—no need to mix thoroughly. In a separate small bowl, mix the 0.5 cup whipped cream with 1 tsp vanilla extract for extra richness. Now, carefully spoon dollops of plain batter onto a greased griddle or nonstick skillet heated to medium-low heat (350°F).
Here's the moment that matters: once the pancakes form small bubbles on the surface (about 1-2 minutes), drizzle the maple syrup mixture in a zigzag pattern over the batter. Then, using the back of a spoon, gently swirl the syrup into the pancake. Immediately add dollops of whipped cream batter on top, then quickly swirl that in too. The heat will create beautiful marbled layers as it cooks.
Cook to Golden Perfection and Stack with Care
Cook each pancake for 2-3 minutes until the edges are set and the top shows small bubbles, then flip carefully. Cook for another 1-2 minutes until golden brown underneath. The pancakes should be cooked through but still slightly springy in the center—they'll finish cooking on the stack. Transfer to a warm plate and repeat with the remaining batter.
Here's where it gets fun—stack your pancakes immediately while still warm. The residual heat will create that perfect, gooey texture between layers. Top with additional whipped cream and a drizzle of maple syrup for serving. Each bite should deliver that perfect balance of fluffy pancake, spiced pumpkin flavor, and sweet maple swirls. Serve with extra whipped cream and a sprinkle of cinnamon for the ultimate fall breakfast!
Pro Tips For Making Pumpkin Pie Pancake
- Whisk the Pumpkin First: Mix the canned pumpkin puree with the wet ingredients (eggs, milk, melted butter) before adding it to the dry mix. I learned this after a batch turned out dense—blending it in first ensures even distribution and prevents lumps that ruin the fluffy texture.
- Measure Cornstarch Precisely: Use a kitchen scale or the "spoon-and-level" method for cornstarch—it’s lighter than flour and too much makes pancakes gummy. I used to eyeball it and ended up with pancakes that stuck together like glue.
- Skip Overmixing the Batter: Stir just until the dry ingredients disappear—overmixing develops gluten and turns pancakes tough. Drop the batter in thick dollops and resist the urge to fold it like pancake batter from a box.
- Use a Light Touch with Sugar: Too much sugar caramelizes too fast, burning the edges before the centers cook. Keep the heat at medium-low and flip only when bubbles form and the edges look set—not before. (Yes, even if you’re impatient like me.)
Essential equipment for great pumpkin pie pancake
Nonstick Skillet
Your nonstick skillet is the MVP for these pancakes—I swear by GreenPan Ceramic or All-Clad Stainless Steel with a nonstick coating. A 10-inch skillet gives you enough space to cook two pancakes at once without crowding, which keeps them golden and even.
Preheat it over medium-low heat (350°F) before adding batter to ensure even cooking and easy flipping. Avoid nonstick sprays—they can leave a residue that ruins the delicate swirl pattern. 🔥
Mixing Bowls
Use two medium mixing bowls (8-10 inches wide) for the wet and dry ingredients. I prefer stainless steel or glass—they’re non-reactive and easy to clean. One bowl should be large enough to hold the dry ingredients while sifting, while the other needs space for whisking the wet ingredients.
Pro tip: Use one bowl for each color (plain batter vs. maple syrup batter) to avoid cross-contamination and keep your swirls clean and vibrant.
Whisk and Spatula
A balloon whisk (like OXO Good Grips) is essential for blending the wet ingredients smoothly, while a heat-resistant silicone spatula (such as Mercer Culinary) helps fold the batter gently without tearing the swirls.
The whisk ensures no lumps remain in the pumpkin puree, and the spatula’s flexibility makes it perfect for creating those signature marbled patterns on the griddle. 💫
Measuring Tools
Precision matters here—use a stainless steel measuring cup for the flour, pumpkin puree, and milk, and a microplane for freshly grating nutmeg (if you’re not using pre-ground). A digital kitchen scale (like OXO Good Grips) is ideal for the flour to avoid packing it down.
For the spices, a small spice scoop ensures accurate measurements—2 tsp cinnamon is different from 1 tsp, and you’ll taste the difference!
Grease and Brush
Keep a small bowl of melted butter (or coconut oil) nearby for greasing the skillet between batches. A silicon brush (like Norpro) works best—it coats the pan evenly without leaving streaks.
I also keep a paper towel roll handy to wipe excess grease before adding the next pancake. This prevents sticking and ensures that beautiful golden-brown crust every time. ✨
Warm Plate or Stacking Tray
Transfer cooked pancakes to a warm plate or stacking tray (like a wire cooling rack) to keep them soft and prevent sogginess. I like to place a clean kitchen towel underneath to absorb any excess moisture.
If you’re serving immediately, a wooden serving board adds a rustic touch and keeps the pancakes warm while you stack them. This step is key—cold plates make pancakes tough and dry faster.
Nutrition facts
Frequently asked questions
Can I make these without a blender or food processor?
The recipe doesn't require blending—just whisk the wet ingredients until smooth. The pumpkin puree will mix in perfectly with a whisk or fork. For extra smoothness, you can press it through a fine-mesh strainer after whisking, but it's not necessary. The texture will still be light and fluffy!
How do I adjust the recipe for fewer/more servings?
This recipe makes 6 pancakes. For fewer servings, reduce all ingredients by 20% (about 4 pancakes). For more, increase by 25% (8 pancakes). The key is maintaining the ratio of 1 cup pumpkin puree : 1.5 cups flour to keep the texture perfect. Double batches work best when made fresh!
Why are my pancakes dense instead of fluffy?
Dense pancakes usually mean overmixing or underbaked batter. Mix just until combined (you should see flour streaks), and use cornstarch as called for. Also ensure your baking powder is fresh—old leavening loses potency. Cook until bubbles form on top (2-3 minutes per side) and the center springs back when touched.
Can I make these ahead of time?
Yes! Cooked pancakes reheat beautifully. Store in an airtight container for 3 days in the fridge or 3 months frozen (separated by parchment). Reheat in a toaster or skillet over medium-low heat for 1-2 minutes until crispy. The swirls may separate slightly when reheated—just add extra syrup when serving!
What's the best way to add extra protein?
For a protein boost, stir in 1/2 cup Greek yogurt or 1/4 cup cottage cheese with the wet ingredients. Both add creaminess without altering the texture. For a nutty twist, fold in 1/4 cup chopped walnuts—just toast them first for extra flavor! Keep the batter thick but pourable by adjusting milk as needed.