Desserts
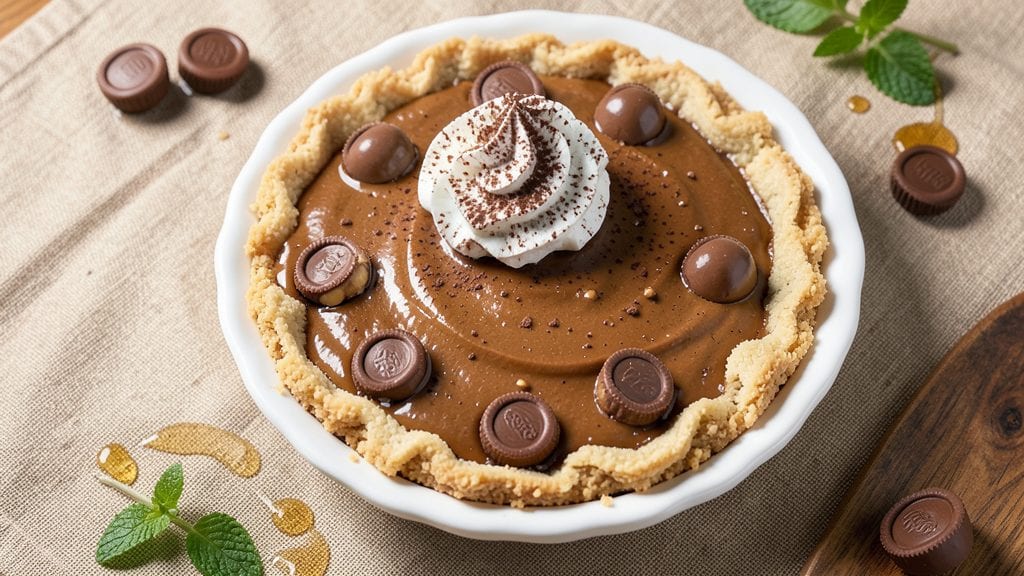
This peanut butter pie with Reese's peanut butter cups recipe delivers the ultimate combination of creamy peanut butter filling and fudgy, crunchy surprises in every slice. After testing countless variations, I've perfected a method that ensures a rich, velvety texture with perfectly melted Reese's cups throughout.
The secret lies in precise ingredient ratios and careful baking techniques that prevent cracking while maximizing flavor.
The crust is made with a simple graham cracker base that stays sturdy even when loaded with filling, while the peanut butter mixture incorporates melted Reese's cups for those signature swirls and bursts of chocolatey peanut butter goodness.
This recipe requires just 15 minutes of prep work, followed by 40 minutes of baking time, and a mandatory 4-hour chilling period to achieve that perfect, sliceable consistency.
What you'll end up with is a decadent pie that looks impressive yet comes together with straightforward techniques. The peanut butter filling remains silky smooth, the Reese's cups maintain their signature fudgy texture, and the graham cracker crust provides the perfect contrast.
Each bite delivers a harmonious blend of peanut butter, chocolate, and crunch that's impossible to resist.
This dessert is ideal for special occasions, holiday gatherings, or when you simply crave something sweet and indulgent. The recipe makes one 9-inch pie, but the filling can easily be doubled for larger gatherings. Let's create this showstopping dessert that will have everyone asking for seconds.
Ingredients for peanut butter pie with reese's peanut butter cups
Fudgy swirls, crunchy surprises, and velvety peanut butter perfection—just 11 ingredients for a showstopping pie.
| Ingredient | Amount | Notes |
|---|---|---|
| Graham Cracker Crumbs 🍪 | 2 ½ cups | For sturdy crust base |
| Unsalted Butter 🧈 | ¾ cup | Melted, full-fat preferred |
| Granulated Sugar 🍚 | 1 ½ cups | White or light brown |
| Peanut Butter 🥜 | 2 cups | Creamy, natural style |
| Large Eggs 🥚 | 4 whole | Room temperature preferred |
| Heavy Whipping Cream 🥛 | 1 cup | Full-fat for best texture |
| Vanilla Extract 🌿 | 2 tsp | Pure Madagascar preferred |
| Reese's Peanut Butter Cups 🍫 | 12 oz | Mini or full size, chopped |
| Powdered Sugar 🍚 | ½ cup | For dusting top |
| Salt 🧂 | ½ tsp | Fine sea salt |
| Dark Chocolate Chips 🍫 | ¼ cup | Optional for extra richness |
The Reese's cups are non-negotiable—mini size melts more evenly, but full cups add serious crunch. Trader Joe's sells them in bulk, and the mini ones are perfect for even distribution. For the peanut butter, natural style without added sugar keeps the filling from getting too sweet, but if you prefer creamy, go for it. The graham crackers should be sturdy—Honey Maid or Keebler work best, but any high-quality brand will do. Melt the butter slowly to avoid burning, and let the crust cool completely before adding filling to prevent sogginess.
No Reese's cups? Chopped chocolate-covered peanuts or homemade peanut butter cups (melted peanut butter + chocolate chips) work in a pinch. Substituting powdered sugar for granulated? Use 1.25 cups instead—it packs differently. The dark chocolate chips are optional but add a luxurious depth that pairs perfectly with the peanut butter. If you're making this ahead, prepare the filling 24 hours early and let it sit at room temperature before pouring—it'll be even smoother. For extra decadence, fold in 1 tbsp of peanut butter powder to intensify the flavor.
This pie needs 4 hours of chilling—no shortcuts! Store leftovers in the fridge for up to 5 days, covered tightly. Freeze slices for up to 3 months by wrapping them individually in plastic. The crust stays crispy if you keep it refrigerated, but the filling softens slightly at room temperature. For serving, dust with extra powdered sugar and a sprinkle of crushed graham crackers—trust me, it's worth it. Double the filling for a 9x13-inch pan if you're feeding a crowd.
Why You'll Love This Recipe
- No-Fuss Crust: I crush graham crackers in my food processor—three minutes—then mix in melted butter until it’s like wet sand. No rolling, no stress, just press it into the pan and move on.
- Reese’s Upgrade: That creamy peanut butter filling gets a whole new level when you fold in chopped Reese’s cups. The chocolate chunks melt into the custard, turning every bite into a little surprise party in your mouth.
- Party in a Pan: This pie feels fancy enough for birthdays or holidays, but honestly? I’ve served it at potlucks, book club meetings, and even my kid’s soccer game. The graham crust holds up, and the peanut butter filling stays rich—no one ever guesses it’s this easy.
- Budget Magic: Peanut butter and eggs stretch this dessert to feed six for under $10. The graham crust uses pantry staples, and the Reese’s cups? A single bag lasts for two pies. Leftovers? They disappear faster than I can say “seconds.”
Step-by-step instructions for peanut butter pie with Reese's peanut butter cups
This decadent pie delivers fudgy swirls and crunchy surprises in every bite—here's how to assemble it perfectly.
Prepare the Crust Base
In a medium bowl, combine the 2.5 cups graham cracker crumbs with the 0.75 cup melted unsalted butter. Mix until the crumbs are uniformly moistened and the texture resembles damp sand. Press this mixture firmly into a 9-inch pie dish, using the back of a measuring cup to create an even, compact crust. I like to press it about ¼-inch thick—this ensures a sturdy foundation that won't crumble during baking.
Chill the crust in the refrigerator for at least 30 minutes while you prepare the filling. This cold start prevents the crust from absorbing too much moisture from the warm filling later. For extra insurance, you can blind-bake it for 5 minutes at 350°F before adding the filling, but I've found the chilling alone works beautifully for this recipe.
Create the Peanut Butter Filling
In a large mixing bowl, whisk together the 2 cups peanut butter, 1.5 cups granulated sugar, 4 whole large eggs, 1 cup heavy whipping cream, 2 teaspoons vanilla extract, and 0.5 teaspoon salt until completely smooth. The mixture should be velvety and homogeneous—no streaks of peanut butter should remain. I use a hand mixer for this step, blending on medium speed for about 3 minutes until it's perfectly incorporated.
Pour this filling into the prepared crust, spreading it evenly with a spatula. Tap the pie dish gently on the counter to remove any air bubbles that might have formed. This ensures your pie has a smooth, even surface when baked. The filling should come up to about ½-inch from the edge of the crust—this gives you plenty of room for the swirls we'll add next.
Add the Reese's Swirls and Chocolate
Chop the 12 ounces Reese's peanut butter cups into small, irregular pieces—about ½-inch chunks work perfectly. Scatter these pieces evenly over the peanut butter filling, pressing them down gently so they nestle into the surface. Then, sprinkle the 0.25 cup dark chocolate chips evenly over the top. This creates those signature crunchy surprises throughout each slice.
Here's the secret: don't press the Reese's pieces too firmly, or they'll melt completely during baking. You want them to soften just enough to create pockets of gooey peanut butter while maintaining some crunch. The chocolate chips will melt into little rivers of rich, dark chocolate that contrast beautifully with the peanut butter filling.
Bake to Perfection
Bake the pie at 350°F for 40-45 minutes, or until the edges are set and the center still has a slight wobble (it will firm up as it cools). You'll know it's done when the filling is just set but still has that perfect fudgy texture. The top should be golden brown, and the Reese's pieces should be softened but not completely melted.
Remove the pie from the oven and let it cool completely at room temperature. This cooling process is crucial—it allows the filling to set properly and prevents the crust from becoming soggy. I like to place it on a wire rack to ensure air circulates around the bottom as well. Once completely cool, refrigerate the pie for at least 4 hours, or preferably overnight. This chilling time develops the flavors and creates that perfect sliceable texture.
Dust and Serve
Before serving, dust the top generously with the 0.5 cup powdered sugar using a fine-mesh sieve. This creates that signature snowy finish that makes the pie look even more tempting. Let the powdered sugar settle for about 1 minute before cutting—this prevents it from sliding off when you slice.
Slice the pie into wedges and serve immediately. Each bite should deliver that perfect balance of creamy peanut butter filling, crunchy Reese's pieces, and rich chocolate accents. The crust should be sturdy but tender, providing a delightful contrast to the rich filling. Store any leftovers in the refrigerator for up to 5 days, though I doubt you'll have any left!
Pro Tips For Making Peanut Butter Pie With Reese'S Peanut Butter Cups
- Melt Butter Slowly: If you dump melted butter into graham cracker crumbs and mix too fast, you’ll end up with a greasy mess. Heat the butter to just under simmer (160°F), then drizzle it into the crumbs while stirring—this coats each piece evenly without turning the crust into peanut butter paste.
- Use Creamy Peanut Butter: Chunky peanut butter works, but creamy gives that silky texture the pie deserves. If you’re using chunky, pulse it in a food processor first—just until smooth. No processor? Mash it with a fork until no lumps remain.
- Avoid Overmixing the Filling: Whisk the peanut butter, sugar, and eggs just until combined—overmixing adds air, which can make the filling sink or crack. Stop when the batter looks smooth but still thick; it’ll hold its shape better when baked.
- Chill the Crust First: Press the graham cracker crust into the pan, then pop it in the freezer for 15 minutes before adding the filling. This prevents the crust from turning to soup when the warm filling hits it—trust me, you’ll notice the difference.
Pro cooking tips for perfect results
Crust Perfection
Pressing the graham cracker crust is where many home bakers fail—don’t skip this step! Use the back of a 9-inch measuring cup to create an even, ¼-inch-thick base. I like to press it firmly into the pie dish, then chill for 30 minutes before adding filling.
This prevents the crust from absorbing moisture and becoming soggy. For extra insurance, blind-bake it for 5 minutes at 350°F to create a sturdy foundation that holds up to the rich filling. 🍪
Filling Consistency
The peanut butter filling must be completely smooth—no streaks allowed! Use a hand mixer on medium speed for 3 minutes to fully incorporate the ingredients. If you see any lumps, strain the mixture through a fine-mesh sieve for a silky texture.
The filling should be thick but pourable, like pudding. Pour it into the crust and tap the dish gently on the counter to remove air bubbles—this ensures an even bake and prevents cracks. 🥜
Reese's Placement
Chop the Reese's cups into ½-inch chunks for even melting and distribution. Press them gently into the filling—they should nestle in but not sink to the bottom. The goal is to create pockets of gooey peanut butter while keeping some crunch intact.
Sprinkle the dark chocolate chips on top last, as they’ll melt into little rivers during baking, adding extra richness to every slice. 🍫
Baking Time Mastery
Bake at 350°F for 40-45 minutes until the edges are set but the center still has a slight wobble. Overbaking dries out the filling, while underbaking leaves it too soft. The Reese's pieces should soften but not fully melt—this is key for that perfect crunchy surprise.
Let the pie cool completely before chilling, as rushing this step can cause cracks in the filling. 🌡️
Chilling for Success
This is the most critical step—never skip it! Refrigerate the pie for at least 4 hours, or overnight, to let the filling set properly. The longer it chills, the firmer and more sliceable it becomes.
Dust with powdered sugar just before serving to create that signature snowy finish. Pro tip: Use a fine-mesh sieve for an even, professional-looking dusting. ❄️
Serving Like a Pro
Slice the pie into even wedges using a sharp chef’s knife for clean cuts. Serve immediately to prevent the powdered sugar from sliding off. For an extra touch, garnish with a few extra Reese's pieces or a sprinkle of crushed graham crackers.
The contrast of the creamy filling, crunchy Reese's, and tender crust makes this pie unforgettable. 💫
Nutrition facts
Frequently asked questions
Can I make this peanut butter pie without Reese's cups?
Swap the Reese's cups for 12 ounces of chopped chocolate-covered peanuts or make your own peanut butter cups by melting 1 cup peanut butter with 1 cup chocolate chips. For extra richness, add 0.25 cup dark chocolate chips on top. The key is maintaining the crunchy texture contrast that makes this pie special.
Why does my peanut butter filling turn grainy or separate?
This usually happens when the peanut butter isn't fully incorporated or the mixture sits too long before baking. Use a hand mixer for 3 minutes until completely smooth, and bake within 2 hours of mixing. For extra insurance, strain through a fine-mesh sieve before pouring into the crust. Also, ensure all ingredients are at room temperature.
How do I prevent my pie from cracking during baking?
Cracking happens when the filling sets too quickly or the pie cools unevenly. First, chill the crust for 30 minutes before adding filling. Second, bake at 350°F until the center has a slight wobble (about 40-45 minutes), then let it cool completely at room temperature before refrigerating. The 4-hour chilling is crucial for proper setting.
Can I make this pie ahead of time?
Yes! This pie actually tastes better the next day. Assemble and bake it 24 hours ahead, then refrigerate uncovered. The filling will firm up beautifully, and the flavors develop more deeply. Refrigerate for 4 hours before serving to restore the perfect texture. Store leftovers in the fridge for up to 5 days or freeze slices for 3 months.
What's the best way to serve this pie?
Slice into even wedges using a sharp knife dipped in hot water and wiped clean between cuts. Serve at room temperature with a dollop of whipped cream or a scoop of vanilla ice cream. For extra flair, dust with powdered sugar and garnish with crushed graham crackers or extra Reese's pieces. The contrast of textures makes each bite unforgettable!