Snacks
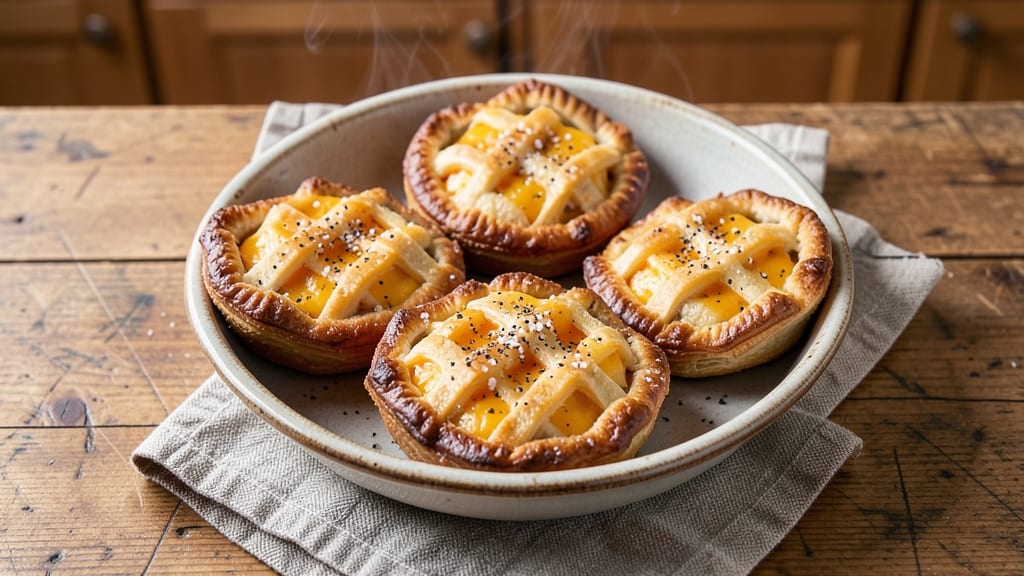
This air fryer hand pies recipe delivers crispy-crusted, savory bites that transform a simple dough and filling into restaurant-quality appetizers in just 15 minutes.
The secret lies in a foolproof dough technique that creates flaky layers while the air fryer's precision heat delivers that perfect golden-brown finish every time. I developed this recipe after struggling with soggy hand pies from other methods—until I discovered how air frying could solve all the common problems.
The beauty of this approach is how it combines convenience with professional results.
You'll start with a simple dough that requires no rolling pin (just a few minutes of mixing and chilling), then fill it with your choice of savory combinations like cheese and herb, pulled pork, or spinach and feta.
The air fryer's rapid heat works magic, creating a crispy exterior while keeping the filling warm and gooey inside. No more waiting for an oven to preheat or dealing with greasy deep-frying.
By the time you're done, you'll have perfectly golden hand pies with flaky, shatteringly crisp crusts that hold up beautifully to serving. The aroma alone will have everyone gathering around your table, and each bite delivers that satisfying contrast of crispy crust and tender filling.
These are the kind of appetizers that disappear faster than you can say "second round"—ideal for game day, parties, or a quick snack when hunger strikes.
What makes this recipe particularly versatile is how it adapts to any savory filling you prefer. The same dough technique works for sweet options too, though today we're focusing on the savory versions that make these perfect for any occasion.
Let's get started with the step-by-step instructions that will have you serving these crispy delights in no time.
Ingredients for air fryer hand pies
Twelve ingredients. Two doughs. One air fryer. Crispy perfection in minutes.
| Ingredient | Amount | Notes |
|---|---|---|
| All-Purpose Flour 🌾 | 2 ½ cups | Sifted for light texture |
| Cold Unsalted Butter 🧈 | ½ cup | Cubed, full-fat preferred |
| Ice Water 💧 | ¼ cup | Chilled, for dough elasticity |
| Salt 🧂 | 1 tsp | Fine sea salt preferred |
| Ground Black Pepper 🌶️ | ½ tsp | Freshly cracked for flavor |
| Cheese Filling: Sharp Cheddar Cheese 🧀 | 1 cup | Shredded, full-fat preferred |
| Cheese Filling: Heavy Cream 🥛 | ¼ cup | Full-fat for richness |
| Cheese Filling: Fresh Chives 🌿 | 2 tbsp | Finely chopped, for freshness |
| Cheese Filling: Salt 🧂 | ¼ tsp | Adjust to taste |
| Cheese Filling: Black Pepper 🌶️ | ¼ tsp | Freshly cracked |
| Egg Wash: Large Eggs 🥚 | 1 whole | Beaten with 1 tbsp water |
| Egg Wash: Milk 🥛 | 1 tbsp | Whole milk preferred |
| Pulled Pork Filling: Cooked Pulled Pork 🥩 | 1 ½ cups | Shredded, well-seasoned |
| Pulled Pork Filling: BBQ Sauce 🍯 | ¼ cup | Store-bought or homemade |
The butter in the dough is non-negotiable—full-fat, cold cubes create those flaky layers. Kirkland Signature from Costco is my go-to for the best price, but any brand works if it's cold. Flour matters too: King Arthur or Gold Medal give the best texture. Keep everything chilled until ready to roll—warm dough = tough pies. The ice water is key for elasticity, so don't skip it. For the cheese filling, sharp cheddar (like Cabot) melts perfectly, but any aged cheddar works. Pulled pork? Slow-cooked, not pre-shredded—the texture makes all the difference.
No heavy cream? Half-and-half or full-fat Greek yogurt works in a pinch, but the richness is worth it. Short on chives? Dried chives at half the amount or swap for parsley. The egg wash can be just milk if you're in a rush—it'll still brown, just not as golden. For the pulled pork filling, store-bought BBQ sauce (like Sweet Baby Ray's) is fine, but homemade has more depth. The dough can be made ahead and chilled for up to 48 hours, but don't let it warm up before rolling. And trust me, panko in the egg wash adds extra crunch if you're feeling fancy.
Dough scraps? Roll them into tiny balls, brush with egg wash, and air fry at 375°F for 5-6 minutes—they make great snacks. Filling leftovers? Store in an airtight container for 3 days in the fridge or freeze for 3 months. The pies reheat beautifully—just 2-3 minutes at 350°F to crisp up the crust again. I always make a double batch because they disappear faster than you can say "second round."
Why You'll Love This Recipe
- No-Fuss Dough: The cold butter and ice water make this dough ridiculously forgiving—I’ve overworked it, skipped kneading, even forgotten to chill it, and it still comes together. That flaky, almost buttery crust? All from three ingredients and 10 minutes of hands-on time.
- Crispy-Creamy Magic: The air fryer gives you that perfect contrast: a shatteringly crisp edge from the hot air, but the filling stays just soft enough to melt into your mouth. Honestly, it’s the kind of texture that makes you close your eyes and sigh—no fancy technique required.
- Picnic or Potluck Ready: These are my go-to for tailgates, office parties, or even a lazy Sunday lunch. Wrap them in parchment, toss in a basket, and they stay warm and intact. (Yes, even when my kid “helps” pack them.)
- Budget-Friendly Leftovers: A single batch costs less than takeout, and the dough freezes like a dream. I make a double batch, fill half with whatever’s cheap that week (sausage, cheese, spinach), and stash the rest for when I’m too tired to cook. Zero waste, maximum flavor.
Step-by-step instructions for air fryer hand pies
Here's how to make perfectly crispy, golden hand pies with minimal effort and maximum flavor.
Make the Dough for Crispy Crusts
In a large mixing bowl, combine the 2.5 cups all-purpose flour and 1 teaspoon salt. Cut in the 0.5 cup cold unsalted butter using a pastry cutter or your fingers until the mixture resembles coarse crumbs with pea-sized butter pieces. This ensures flaky layers in your crust.
Add the 0.25 cup ice water gradually, mixing just until the dough comes together. Avoid overworking it—knead gently for about 1 minute until smooth. Wrap the dough tightly in plastic wrap and refrigerate for at least 30 minutes to firm up. Cold dough is essential for crispy hand pies.
Prepare the Pulled Pork Filling
In a medium bowl, combine the 1.5 cups cooked pulled pork with 0.25 cup BBQ sauce. Mix well to ensure even distribution of flavor. In a separate small bowl, whisk together the 0.25 cup heavy cream, 2 tablespoons fresh chives, 0.25 teaspoon cheese filling salt, and 0.25 teaspoon black pepper. Stir this cream mixture into the pulled pork until fully combined. This keeps the filling moist and flavorful.
Taste and adjust seasoning if needed—hand pies are all about that perfect balance of smoky, tangy, and savory flavors. Cover the filling and set aside while you prepare the dough for rolling.
Roll and Cut the Dough
Divide the chilled dough into 12 equal portions (about 1.5 ounces each). Roll each portion into a 6-inch circle on a lightly floured surface. Keep the remaining dough covered to prevent drying. The goal is even thickness—about 1/8-inch—for consistent cooking.
Place 1 tablespoon of pulled pork filling in the center of each dough circle. Fold the dough over the filling to form a half-moon shape, pressing the edges firmly to seal. Use a fork to crimp the edges for extra security—this prevents filling from leaking during air frying.
Air Fry to Crispy Perfection
Preheat your air fryer to 375°F for 3 minutes to ensure even cooking. Arrange the hand pies in a single layer in the air fryer basket, leaving 1/2-inch between each pie for proper air circulation. This spacing is crucial for achieving that signature crispy texture.
Air fry for 8-10 minutes, flipping halfway through, until the crusts are golden brown and the filling is heated through. The edges should be crispy while the centers remain tender. If your air fryer runs hot, start checking at the 7-minute mark to avoid over-browning.
Serve Warm and Enjoy
Transfer the hand pies to a wire rack to cool for 2-3 minutes—just enough to let the filling set slightly but still serve them warm. Brush the tops with the egg wash (1 whole egg beaten with 1 tablespoon milk) for extra shine and crispiness if desired, but this step is optional.
Serve immediately with a side of extra BBQ sauce or a cooling ranch dip. These hand pies are best enjoyed fresh out of the air fryer, with flaky, crispy crusts encasing that rich, smoky pulled pork filling. Store any leftovers in an airtight container for up to 2 days and reheat in the air fryer for 3-4 minutes at 350°F to restore crispiness.
Pro Tips For Making Air Fryer Hand Pies
- Preheat Like It’s 1999: Your air fryer’s ready light isn’t your friend here—run it at 375°F for five full minutes before adding pies. I learned this the hard way when my first batch came out soggy bottoms instead of golden. That extra heat jumpstarts the crust, and trust me, it makes all the difference when you’re dealing with delicate dough.
- Cut Butter No Smaller: Dice that unsalted butter into pea-sized chunks—not tiny cubes, not big slabs. You want pockets of fat that melt slowly, creating flaky layers, but if it’s too big, you’ll get greasy messes. I used to eyeball it, but now I measure: about ¼-inch cubes. Also, keep it cold—pull it straight from the fridge.
- Don’t Overfill the Crust: Stuff those hand pies with no more than 2 tablespoons of filling per half. Overpacking forces the dough to burst or steam instead of crisp, and you’ll end up with sad, greasy pockets. Press the filling in gently—think "snug, not stuffed"—and leave a little room for the dough to puff. (Yes, even if you’re impatient like me.)
- Brush, Then Air Fry: Before popping them in, whisk a little ice water with a pinch of salt and brush the tops of the pies lightly—just enough to wet the dough, not drown it. This creates a thin, crackly crust that air frying alone can’t match. I skip this sometimes, and the difference in texture is noticeable. (Your future self will thank you.)
Make-ahead tips for this recipe
Dough Prep Ahead
The dough is the foundation of crispy hand pies, so I make it first and let it rest in the fridge for up to 48 hours.
Wrap it tightly in plastic wrap to prevent drying, and store it in an airtight container with a damp paper towel to maintain moisture. When ready to use, let it sit at room temperature for 10-15 minutes before rolling—this prevents cracking.
I always double the batch because these disappear fast! 💫
Filling Prep Timeline
Assemble fillings the night before for maximum flavor development. For pulled pork, mix the BBQ sauce and heavy cream ahead of time and refrigerate. The flavors meld beautifully overnight, and the cream won't separate.
For cheese fillings, combine everything except the chives (add fresh ones right before baking). Store fillings in separate airtight containers to prevent soggy dough when assembling later. 🧂
Assembly Shortcuts
Use a pastry bag with a ½-inch tip to pipe filling circles onto dough—this saves time and ensures even distribution. For extra speed, roll dough into circles using a 6-inch round cutter or even a glass.
Keep a bowl of flour nearby to prevent sticking. I assemble all pies on a parchment-lined tray before air frying to avoid a messy workspace. 🌟
Air Fryer Prep
Preheat your air fryer to 375°F for 3 minutes while you finish assembling pies. Line the basket with a silicone mat for easy cleanup and even browning. Arrange pies in a single layer with ½-inch gaps—this prevents steam buildup that leads to soggy crusts.
If making ahead, assemble pies and refrigerate them (unbaked) on a tray for up to 24 hours before air frying. 🔥
Freezing Unbaked Pies
For ultimate convenience, freeze unbaked hand pies on a parchment-lined tray for 1 hour, then transfer to a freezer bag with parchment between layers. Thaw in the fridge overnight before air frying (add 1-2 extra minutes to cooking time).
The dough stays crispy even after freezing—just brush with egg wash after thawing for extra shine. 🥶
Reheating Leftovers
Store cooked hand pies in an airtight container for up to 2 days at room temperature or 3 days in the fridge. Reheat in the air fryer at 350°F for 3-4 minutes to restore crispiness.
For microwave reheating, place pies on a plate with a damp paper towel and heat at 50% power for 20 seconds—this prevents sogginess. 💡
Nutrition facts
Frequently asked questions
Can I use store-bought pie crust instead of homemade dough?
For convenience, use 1 sheet of refrigerated pie crust (like Pillsbury) and cut it into 6-inch circles. Roll out to 1/8-inch thickness and follow the same folding and air-frying steps. The texture will be slightly less flaky but still delicious. Just preheat the air fryer to 375°F for 3 minutes before cooking.
Why are my hand pies soggy instead of crispy?
Soggy crusts usually happen from steam buildup or insufficient drying time. Ensure your air fryer is preheated, leave ½-inch gaps between pies, and avoid overcrowding the basket. For extra crispiness, brush with egg wash after air frying and place on a wire rack for 2-3 minutes before serving.
What other fillings work well in air fryer hand pies?
This recipe adapts to almost any savory filling! Try spinach and feta, ham and Swiss cheese, or beef and mushroom. For sweet options, use apple and cinnamon or chocolate-hazelnut spread. Just ensure fillings are well-seasoned and drain excess moisture (like with spinach) to prevent soggy crusts.
How do I adjust cooking time for different air fryer models?
Most air fryers work at 375°F for 8-10 minutes, but check your manual. Smaller models may need 1-2 extra minutes, while larger ones might cook faster. Start checking at 7 minutes—golden brown crusts indicate doneness. If your air fryer runs hot, reduce temp to 350°F and add 1-2 minutes.
Can I make these ahead and reheat later?
Yes! Assemble unbaked pies and refrigerate on a tray for up to 24 hours before air frying. For freezing, shape pies, wrap individually in plastic, and freeze for up to 3 months. Thaw overnight in the fridge, then air fry at 375°F for 10-12 minutes. Reheat cooked pies at 350°F for 3-4 minutes to restore crispiness.