Desserts
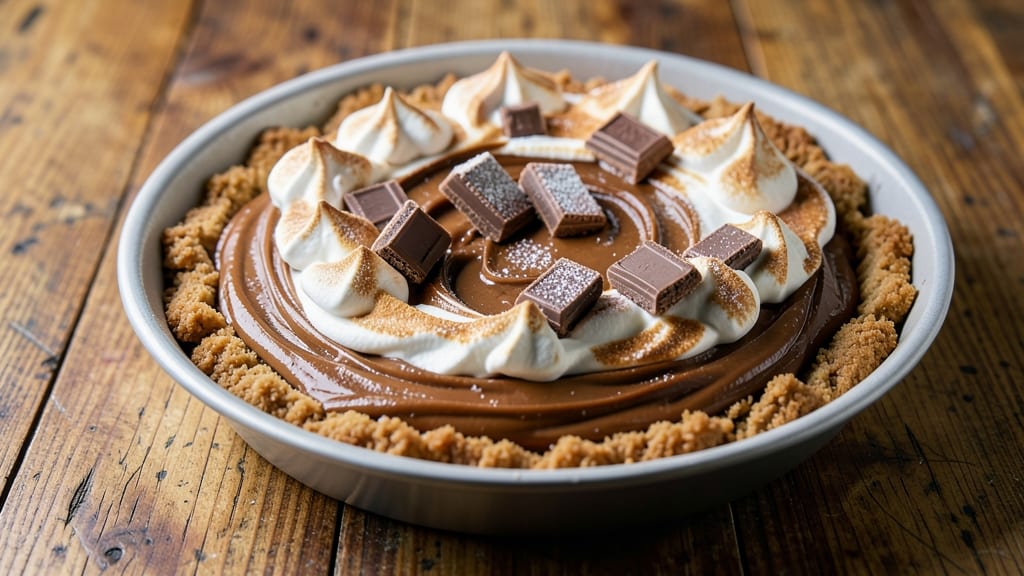
A Twix pie recipe with fudgy caramel swirls and a crunchy peanut butter crust delivers the perfect balance of sweet, salty, and creamy in every bite. This dessert combines the iconic flavors of Twix bars with a buttery crust that holds up beautifully, making it a showstopper for any occasion.
I've perfected this recipe over years of testing, ensuring the filling stays gooey while the crust remains crisp—no soggy bottoms here.
The beauty of this pie lies in its simplicity: just a handful of ingredients come together to create restaurant-quality results at home. You'll start with a peanut butter crust that's rich and sturdy, then layer in crushed Twix bars and a velvety caramel filling that swirls beautifully when baked.
The best part? It requires minimal effort but maximum flavor, with no special techniques needed—just patience for the filling to set properly.
What you'll end up with is a pie that looks as impressive as it tastes: golden caramel swirls peeking through a crunchy crust, topped with whipped cream and extra Twix pieces for texture.
The combination of peanut butter, chocolate, and caramel creates a flavor profile that's impossible to resist. This dessert is foolproof for beginners but impressive enough for gatherings, making it the ultimate crowd-pleaser.
For those with dietary restrictions, a gluten-free crust option is included without compromising texture. Whether you're baking for a celebration or simply craving a decadent treat, this Twix pie delivers every time. Let's get started on creating your perfect slice of indulgence.
Ingredients for twix pie
Twix bars, peanut butter, and caramel come together for this decadent dessert.
| Ingredient | Amount | Notes |
|---|---|---|
| Twix Bars 🍫 | 16 whole | Crushed into small pieces |
| Peanut Butter 🥜 | 1 ½ cups | Creamy, natural style preferred |
| All-Purpose Flour 🌾 | 1 ½ cups | For gluten-free option, use almond flour |
| Granulated Sugar 🍚 | 1 cup | White or brown sugar works |
| Unsalted Butter 🧈 | 1 cup | Cold, cubed for crust |
| Large Egg 🥚 | 1 whole | Room temperature |
| Vanilla Extract 🌿 | 1 tsp | Pure vanilla extract preferred |
| Salt 🧂 | ½ tsp | Kosher or sea salt |
| Heavy Cream 🥛 | 1 ½ cups | Full-fat for best texture |
| Caramel Sauce 🍯 | 1 ½ cups | Store-bought or homemade |
| Whipped Cream 🍦 | 1 cup | For topping, optional |
| Powdered Sugar 🍚 | 2 tbsp | For dusting whipped cream |
| Chocolate Chips 🍫 | ¼ cup | Optional for extra richness |
The Twix bars are the star—grab the classic milk chocolate variety, not the caramel or white chocolate versions. Costco sells them in bulk, which is perfect for big batches. If you're using the gluten-free crust, make sure your peanut butter is certified gluten-free too—Jif Natural or Smucker's both have good options. The caramel sauce can be store-bought (like Smucker's or Log Cabin) or homemade—just make sure it's thick and gooey, not runny. The peanut butter needs to be creamy, not chunky, for the crust to hold together properly. And don’t forget to crush those Twix bars finely—you want them to melt into the filling without leaving big chunks.
No Twix bars? Crushed peanut butter cups and caramel candies work in a pinch, though the flavor won’t be quite the same. Running low on peanut butter? Almond butter or sunflower seed butter can sub, but the crust will taste different. The caramel sauce can’t be substituted with just sugar and butter—it needs that buttery, salty depth. For the crust, if you don’t have almond flour for gluten-free, oat flour or crushed graham crackers are decent alternatives. The whipped cream topping is optional, but if you skip it, add a sprinkle of crushed Twix pieces on top for that extra crunch everyone loves.
This pie keeps beautifully—5 days in the fridge with a tight seal, or 3 months frozen. The crust stays crisp if you store it airtight, but the filling might firm up a bit. Let it sit at room temperature for 10-15 minutes before serving to bring back that gooey texture. I like to make a double batch and freeze one—perfect for last-minute gatherings. If you’re serving it chilled, add the whipped cream right before guests arrive so it doesn’t get soggy. And trust me, the leftovers? Even better the next day.
Why You'll Love This Recipe
- No-Fuss Assembly: I swear, this pie comes together faster than a microwave burrito. You’re basically layering crushed Twix, a creamy peanut butter filling, and a buttery crust—no fancy pastry skills required. The crust? Just flour, sugar, and butter mixed until it clumps. Honestly, my 10-year-old "helped" (read: made a mess) and still got the hang of it.
- Twix-Peanut Butter Magic: That first bite—caramelized Twix crunch with warm peanut butter oozing out? It’s like dessert had a lovechild with comfort food. The sugar in the crust caramelizes just enough to make it taste homemade, but the real star is the peanut butter filling. Thick, rich, and just sweet enough to balance the Twix’s salted caramel. (Yes, even on a Tuesday night.)
- Party in a Pie: This isn’t just dessert—it’s your secret weapon for potlucks, game days, or when you really want to impress. Slice it into squares, and suddenly you’ve got a crowd-pleaser that feels fancy but costs less than half the price of a bakery pie. Between us, I’ve taken it to book club meetings, and no one’s ever asked where I learned to bake.
Step-by-step instructions for Twix pie recipe
This decadent pie combines the best of Twix flavors in every bite—crunchy peanut butter crust, fudgy caramel swirls, and rich chocolate layers. Let's make it happen!
Create the Crunchy Peanut Butter Crust
Preheat your oven to 375°F. In a food processor, combine the 16 whole Twix Bars (crushed into small pieces) and 1.5 cups peanut butter until it forms a thick, crumbly mixture. Press this firmly into a 9-inch pie dish, creating an even layer along the bottom and up the sides. This is your flavor foundation—don't skip the pressing!
Bake the crust for 10 minutes until it's set and just starting to turn golden. Let it cool completely before adding the filling—this prevents a soggy bottom. While it bakes, prepare the filling ingredients in separate bowls for easy assembly.
Prepare the Caramel-Peanut Butter Filling
In a large mixing bowl, combine 1 cup granulated sugar, 1 cup unsalted butter, 1.5 cups heavy cream, and 1.5 cups caramel sauce. Whisk until smooth and fully melted—this creates the rich base for your filling. The mixture should be thick but pourable, like a decadent pudding.
Remove the cooled crust from the oven and carefully pour the caramel mixture into the pie dish. Spread it evenly with a spatula, leaving about ½ inch of space at the edges for the whipped cream topping. This layer will be the heart of your pie, so spread it smoothly for even distribution.
Add the Chocolate Swirl Layer
In a separate bowl, melt the 0.25 cup chocolate chips with 2 tablespoons powdered sugar over a double boiler or in 30-second intervals in the microwave. Stir until completely smooth. Let it cool slightly—you want it to be thick enough to swirl but still pourable.
Drop spoonfuls of the chocolate mixture onto the caramel layer and gently swirl with a knife or skewer. This creates those signature marbled swirls that make this pie irresistible. Work quickly so the chocolate doesn't set before you finish swirling.
Assemble and Chill the Pie
Whip the 1 cup whipped cream until soft peaks form, then fold in 1 teaspoon vanilla extract and 0.5 teaspoon salt. Spread this evenly over the chocolate swirls, creating a smooth, creamy top layer. The whipped cream adds lightness that balances the rich filling.
Cover the pie and refrigerate for at least 4 hours (overnight is best). This chilling time lets all the flavors meld together while keeping the textures perfect—crisp crust, creamy filling, and fluffy topping. The longer it chills, the more pronounced the flavors become.
Serve and Enjoy
Before serving, let the pie sit at room temperature for 10-15 minutes so the whipped cream softens slightly. Slice into wedges and serve immediately—each bite delivers that perfect combination of crunchy crust, creamy caramel, and rich chocolate.
This pie is best enjoyed within 2-3 days when stored properly. For extra indulgence, garnish with additional crushed Twix bars or a drizzle of caramel sauce before serving. Trust me, every slice will disappear quickly!
Pro Tips For Making Twix Pie
- CHOP TWIXES SMALL: Break them into ½-inch chunks—not crumbs, not whole bars. Too big? They’ll sink unevenly. Too small? The crust gets gummy. I learned this after pulling out a pie with half the Twix still in one piece, like a sad, melted landmine.
- MELT BUTTER LOW: Heat the butter for the crust over medium-low, stirring constantly until it’s just shimmering, not browned. I used to rush this, and the crust would turn greasy instead of flaky. Trust me, 5 minutes of patience here saves you from a soggy bottom later.
- SKIP THE PEANUT BUTTER CRUMBLE: If your peanut butter is thick, don’t force it. Mix in 1-2 teaspoons of warm water or milk to loosen it before folding into the flour-sugar mix. I’ve had sticky, clumpy fillings that refused to set because of stubborn peanut butter—this fixes it every time.
- BAKE UNTIL EDGES SET: The center might look underdone, but pull the pie when the edges are firm and the filling has just stopped jiggling. Overbaking turns the peanut butter layer rubbery. I used to wait for the center to look “done,” only to end up with a sad, dense mess. Use a toothpick—it should come out mostly clean, not wet.
Common mistakes when making perfect results
Overbaking the Crust
I’ve seen this happen more times than I can count—overbaking the peanut butter crust turns it from perfectly crunchy to dry and brittle. The crust only needs 10 minutes at 375°F to set and just start golden.
Any longer, and it’ll lose that ideal snap. Watch it closely, especially if your oven runs hot. A toothpick test works: insert it into the crust—it should come out clean with no wet dough clinging. 🔥
Skipping the Cooling Step
One of the biggest rookie mistakes? Adding the filling to a still-warm crust. The heat from the filling will melt the butter in the crust, making it soggy and ruining that crisp texture.
Always let the crust cool completely before pouring in the caramel mixture. I promise, the extra 10-15 minutes waiting will save your pie from becoming a sad, mushy mess.
Uneven Filling Distribution
If your caramel filling isn’t spread evenly, you’ll end up with thick, dense spots and thin, runny areas. Use a spatula to create a smooth, even layer—about ½ inch thick
Pro tip: Tap the pie dish gently on the counter a few times to help the filling settle uniformly before adding the chocolate swirls. This ensures every bite has that perfect balance of flavors. I get it—you’re eager to dig in! But rushing the 4-hour (or overnight) chill is a recipe for disaster. The filling needs time to set properly, and the flavors need to meld together. If you cut into it too soon, the whipped cream will slide off, and the filling might still be too soft. Trust the process—your patience will be rewarded with a pie that holds its shape and delivers that creamy, dreamy texture. ✨ Not all Twix bars are created equal! The classic milk chocolate variety is what you want for that perfect balance of peanut butter, caramel, and chocolate. If you accidentally grab the caramel or white chocolate versions, your pie will taste off—too sweet or too mild. Stick with the original, and you’ll get that authentic Twix flavor in every bite. Costco or grocery store bulk packs are your best friends for this recipe. When you’re swirling the chocolate into the caramel, it’s easy to overmix and create a muddy, uniform color instead of those beautiful marbled swirls. Work quickly and gently—drop spoonfuls of the melted chocolate onto the caramel layer and use a skewer or knife to drag it through in smooth, deliberate strokes. Think of it like painting: less is more. The goal is to create contrast, not blend everything together. 💫Rushing the Chill Time
Using the Wrong Twix Bars
Overmixing the Chocolate Swirl
Nutrition facts
Frequently asked questions
Can I make this Twix pie without a food processor?
For the crust, crush the Twix bars by hand using a rolling pin or heavy mug, then mix with peanut butter by hand. The texture will be slightly less fine but still delicious. For the chocolate swirl, melt chocolate chips in 30-second intervals in the microwave instead of using a double boiler.
How do I make this gluten-free?
Replace the all-purpose flour with 1.5 cups almond flour for the crust. Use certified gluten-free peanut butter and ensure your Twix bars are made in a gluten-free facility. The texture will be slightly denser but still hold together beautifully when chilled properly.
Can I substitute store-bought caramel sauce?
Yes, store-bought caramel sauce works perfectly! Brands like Smucker's or Log Cabin add the ideal buttery, salty depth. Just ensure it's thick and gooey—not runny. For extra richness, you can even add 1 tablespoon of corn syrup to the caramel mixture to enhance the swirl effect.
Why did my crust turn out greasy?
A greasy crust usually means too much peanut butter or butter was used. Stick to the exact measurements (1.5 cups peanut butter and 1 cup butter) and press the crust firmly into the pie dish. Chill the crust for 15 minutes before baking to help it set properly.
How can I make this pie ahead of time?
Assemble the pie completely (including whipped cream) and refrigerate for up to 5 days. For longer storage, freeze the baked pie (without whipped cream) for 3 months. Thaw overnight in the fridge before serving. Add fresh whipped cream just before serving to keep it fluffy.