Desserts
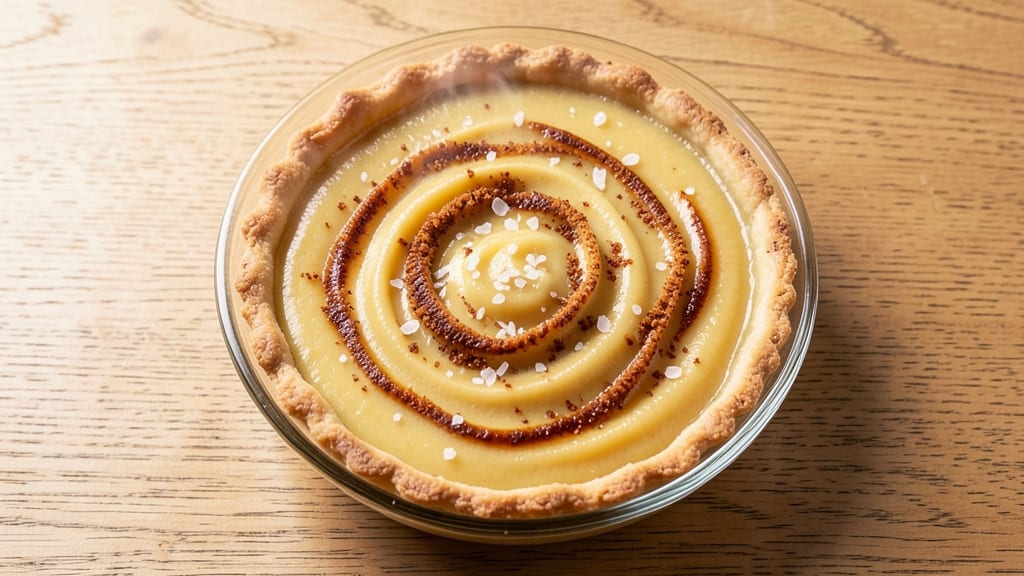
This no-crust custard pie recipe delivers all the creamy vanilla perfection of a classic dessert without the fuss of a traditional crust. After years of testing variations, I've perfected a method that ensures a silky, jiggly center every time—no soggy bottoms or undercooked filling here.
The secret lies in precise temperature control and a clever base alternative that holds up beautifully.
The beauty of this recipe is its flexibility. While traditional custard pies require a flaky crust, this version lets you choose from options like crushed graham crackers, a buttery cookie crumble, or even a quick baked crust substitute.
Each alternative adds its own texture—crunchy, tender, or slightly crispy—without compromising the custard's signature smoothness. It's the kind of dessert that feels indulgent yet comes together with minimal effort.
What you'll end up with is a golden custard pie that's perfectly set at the edges while remaining silky in the center, ready to be topped with whipped cream, fresh berries, or a sprinkle of cinnamon.
The filling stays rich and velvety, with no graininess or separation, thanks to a foolproof technique that's been tested through countless batches. This is comfort food at its finest—elegant enough for company but simple enough for a weeknight treat.
Whether you're hosting a dinner party or craving a classic dessert with less prep, this recipe delivers restaurant-quality results without the hassle. The custard's velvety texture and vanilla flavor shine through, making it a crowd-pleaser that always gets rave reviews. Let's get started on creating your perfect custard pie.
Ingredients for no crust custard pie
Creamy custard perfection meets effortless no-crust convenience with these essential ingredients.
| Ingredient | Amount | Notes |
|---|---|---|
| Large Egg Yolks 🥚 | 6 whole | Freshly separated from pasteurized eggs preferred |
| Granulated Sugar 🍚 | 1 ¼ cups | Superfine preferred for faster dissolution |
| Whole Milk 🥛 | 2 cups | Full-fat for optimal creaminess |
| Unsalted Butter 🧈 | ¾ cup | Cold, cubed for even melting |
| Pure Vanilla Extract 🍯 | 2 tsp | Bottled or seedless preferred |
| Salt 🧂 | ¼ tsp | Diamond Crystal kosher preferred |
| All-Purpose Flour 🌾 | ¼ cup | For thickening base mixture |
| Heavy Whipping Cream 🥛 | 1 cup | Cold for proper whipping |
| Graham Cracker Crumbs 🍪 | 1 ½ cups | Honeycomb variety preferred |
| Light Brown Sugar 🍚 | ¼ cup | Packed for crust sweetness |
| Melted Unsalted Butter 🧈 | ½ cup | Cooled to room temperature |
| Ground Cinnamon 🍃 | 1 tsp | Freshly ground preferred |
| Vanilla Bean Paste 🍯 | 1 tsp | For enhanced vanilla flavor |
| Cornstarch 🌾 | 2 tbsp | For custard stability |
The custard's velvety texture hinges on high-quality egg yolks—opt for pasteurized if concerned about raw eggs. Whole milk provides the ideal fat content for richness, while unsalted butter ensures a smooth finish without altering flavor balance. For the crust alternative, graham cracker crumbs offer the perfect crunch-to-tenderness ratio, though crushed digestive biscuits work equally well for a more neutral base. Pure vanilla extract and vanilla bean paste together deliver that signature aroma without bitterness. Diamond Crystal kosher salt dissolves cleanly and enhances every flavor note.
Substitutions should prioritize texture and fat content. Heavy cream can replace milk at a 1:1 ratio, though the custard will be slightly lighter. Powdered sugar works in a pinch for the granulated sugar but may yield a slightly grainier texture. For the crust, crushed vanilla wafers or shortbread cookies add distinct flavors while maintaining structure. Cornstarch can be swapped for arrowroot powder at the same measurement, though custard may set slightly faster. Superfine sugar isn't strictly necessary**—regular granulated sugar will work if pulsed briefly in a food processor, though it dissolves more slowly.
Prevent lumps by whisking cornstarch and flour together with sugar before adding liquids. The custard mixture should be smooth and fully combined before baking. Store assembled pie in an airtight container for up to 4 days in the refrigerator, though it's best enjoyed within 2 days for optimal texture. For make-ahead convenience, prepare the crust mixture and custard separately, then assemble just before baking. The pie reheats beautifully—350°F for 10-15 minutes restores its silky center if fully chilled.
Why You'll Love This Recipe
- No Bowl Needed: I swear by this—just whisk yolks, sugar, and milk right in the pie dish. No extra bowls, no sticky mess, just smooth sailing from start to finish. The butter and vanilla melt right in, so you’re basically stirring a dreamy pudding that magically sets when baked.
- Velvet-Smooth Magic: That first spoonful? Pure comfort. The yolks and sugar caramelize just enough to give it a rich depth, while the whole milk keeps it silky. A splash of vanilla ties it all together—like dessert hugging you back after a long day.
- Weeknight Hero: Between us, this is my go-to when I need something impressive but effortless. Serve it warm with ice cream for dinner guests or let it chill for breakfast the next morning. No crust means no fuss, just pure custard satisfaction.
- Budget-Friendly Luxury: Honestly, the ingredients cost pennies but taste like a fancy bakery. Egg yolks and milk stretch far, and you’re not wasting dough on a crust. Plus, leftovers? They keep for days—perfect for when you’re too tired to bake again.
Step-by-step instructions for no-crust custard pie
This method delivers a velvety custard center with a crumbly graham cracker base—no rolling crust required.
Prepare the Graham Cracker Crust Base
Preheat your oven to 350°F and grease a 9-inch pie dish with nonstick spray. In a medium bowl, combine the 1.5 cups graham cracker crumbs, 0.25 cup light brown sugar, 1 tsp ground cinnamon, and 0.5 cup melted unsalted butter (cooled to room temperature). Mix thoroughly until all crumbs are evenly moistened and the texture resembles wet sand.
Press the mixture firmly into the prepared pie dish, using the back of a spoon to compact it evenly against the bottom and up the sides. Bake for 10 minutes until the edges begin to turn golden. Remove from the oven and let cool completely—this prevents the custard from steaming and becoming watery when poured over later.
Whisk the Custard Base Ingredients
In a heatproof bowl that fits snugly over a saucepan (or use a double boiler), whisk together the 6 whole large egg yolks, 1.25 cups granulated sugar, 2 tbsp cornstarch, and 0.25 tsp salt until smooth and fully combined. This mixture should be pale yellow with no visible streaks of cornstarch.
Gradually whisk in the 2 cups whole milk and 0.75 cup unsalted butter (cold, cubed), ensuring the butter melts completely into the mixture. Stir in the 2 tsp pure vanilla extract and 1 tsp vanilla bean paste, whisking until the paste is fully incorporated and no lumps remain. The mixture should be thick but pourable—if it's too stiff, whisk in 1-2 tablespoons of milk to reach the right consistency.
Temper and Cook the Custard
Place the bowl over a saucepan filled with 2 inches of simmering water, ensuring the bottom of the bowl doesn't touch the water. Cook the custard over medium-low heat, stirring constantly with a wooden spoon or silicone spatula, for 8-10 minutes until it thickens enough to coat the back of the spoon. You'll notice the mixture will go from slightly runny to a glossy, creamy texture that leaves a visible trail when the spoon is lifted.
Remove the bowl from heat and immediately stir in the 1 cup heavy whipping cream and 0.25 cup all-purpose flour. The cream should blend smoothly into the custard, creating a uniform texture. Let the custard sit for 5 minutes to thicken further—this resting period prevents it from breaking when poured over the crust.
Assemble and Bake the Pie
Pour the custard mixture carefully over the cooled graham cracker crust, spreading it evenly to the edges. The custard should reach just below the rim of the pie dish—this ensures it sets properly without overflowing. Place the pie on a baking sheet (to catch any potential drips) and bake at 350°F for 40-45 minutes until the center is just set but still slightly wobbly when gently shaken.
The custard should be firm to the touch but not completely solid—this indicates it's cooked through but still silky. If the edges brown too quickly, loosely cover them with aluminum foil during the last 10 minutes of baking. Remove from the oven and let cool at room temperature for 1 hour before refrigerating.
Chill and Serve for Optimal Texture
Transfer the pie to the refrigerator and chill for at least 4 hours, or preferably overnight. This resting period allows the custard to fully set and develop its signature creamy texture. When ready to serve, run a sharp knife around the edges to loosen it from the pie dish, then slide a spatula underneath to release the pie cleanly.
Slice into wedges and serve chilled. The custard should be smooth, velvety, and hold its shape when cut, with a delicate balance of sweetness from the graham cracker base and the rich vanilla flavor. For an extra touch, dust the top with a light layer of powdered sugar or garnish with fresh berries.
Pro Tips For Making No Crust Custard Pie
- STIR CONSTANTLY UNTIL IT THICKENS: I learned this the hard way—skipping the stir at the end means a lumpy custard. Once the mixture coats the back of a spoon but still drizzles slowly, take it off the heat immediately and keep whisking for another 30 seconds. That final push prevents curdling and guarantees a silky texture.
- USE COLD MILK AND BUTTER: Hot milk or melted butter will scramble those yolks before they have a chance to thicken. Whisk cold whole milk and cut cold butter into cubes—toss them into the warm yolk mixture one at a time while stirring like your life depends on it. The temperature shock matters more than you’d think.
- SKIP THE BOILING WATER BATH IF YOU RUSH: A water bath is foolproof, but if you’re short on time, bake the custard in a deep dish at 325°F (165°C) until the center jiggles barely—about 40-45 minutes. Poke it with a knife; if it comes out clean but slightly wobbly, it’s done. Overbaking turns custard into rubber.
- WHISK EGGS AND SUGAR FIRST: This isn’t just mixing—it’s emulsifying. Beat the yolks and sugar together until they’re pale, thick, and ribbon-like before adding anything else. I was skeptical until I tried it: the custard sets faster, holds its shape better, and tastes richer. (Yes, even if you’re impatient like me.)
Make-ahead tips for no crust custard pie
Prep Components Separately
Divide your prep into two stages: the crust base and the custard mixture. I always make the graham cracker crust mixture first and press it into the pie dish while it's still warm from the oven. This helps it set faster and prevents crumbling when the custard goes in.
Store the crust in an airtight container at room temperature for up to 24 hours before assembling. For the custard, whisk all dry ingredients together first, then gradually add liquids to avoid lumps. This mixture can be refrigerated in an airtight container for up to 2 days before baking. 💫
Bake the Crust Early
Bake the graham cracker crust 1-2 days ahead of time if you're short on time. Simply press it into the pie dish, bake as directed, then let it cool completely. Store it in an airtight container at room temperature.
When ready to assemble, pour the custard over the cooled crust and bake as usual. This shortcut saves you oven time on the day you serve the pie. The crust stays crisp and holds its shape perfectly after reheating. ❄️
Use a Water Bath
For an extra insurance policy against a watery custard, bake your pie in a water bath. Place the pie dish inside a larger roasting pan, then add 1-2 inches of hot water to the pan before baking.
This gentle steam helps the custard cook evenly and prevents the edges from setting too quickly. I find this technique especially helpful when making pies ahead of time—the custard stays silky even after refrigeration. 🌡️
Freeze the Assembled Pie
Assembled pies freeze beautifully for up to 3 months. After baking and cooling, wrap the pie tightly in plastic wrap, then place it in a freezer bag with all the air squeezed out. When ready to serve, thaw overnight in the refrigerator.
For best results, reheat the pie at 350°F for 15-20 minutes before serving to restore its creamy texture. This method is perfect for holiday entertaining when you want to prepare ahead. 🍂
Make the Filling Ahead
Prepare the custard filling up to 2 days in advance and refrigerate it in an airtight container. When ready to assemble, simply pour it over the cooled crust and bake as directed.
For even better results, bring the chilled custard to room temperature before pouring—this helps it flow more smoothly and prevents cracking. I often do this while the oven preheats for perfect timing. 🕒
Portion for Individual Servings
Divide the custard mixture into individual ramekins before baking for perfect single servings. Line a baking sheet with parchment paper and pour the custard into 4-6 ramekins, filling each about ¾ full. Bake at 350°F for 25-30 minutes until set but still slightly wobbly.
These individual custards make elegant desserts for dinner parties or can be frozen for later. Serve with a dollop of whipped cream and a sprinkle of cinnamon. 🍽️
Nutrition facts
Frequently asked questions
Can I make this custard pie without graham crackers?
The graham cracker base is just one option. For a neutral flavor, try crushed vanilla wafers or shortbread cookies. For a baked crust alternative, mix 1 cup flour, ½ cup sugar, and ½ cup melted butter, press into the dish, and bake for 15 minutes before adding custard. This creates a tender, cookie-like base that holds up beautifully.
Why is my custard grainy or lumpy?
Graininess usually means the custard was overcooked or the cornstarch wasn't fully dissolved. Always whisk dry ingredients (cornstarch, sugar) together first, then gradually add liquids. Cook over medium-low heat and remove from heat as soon as it thickens to coat the spoon. Overcooking causes curdling—it should be glossy, not bubbly.
How do I fix a custard that's too thin?
If your custard is too runny after baking, it likely didn't cook long enough. For a quick fix, place the baked pie in a 350°F oven for 5-10 more minutes—this helps it set further. For prevention, ensure your custard reaches the "coat-the-spoon" stage before pouring into the crust. A water bath during baking also helps thicken the custard more evenly.
Can I use this recipe for individual servings?
Yes! Divide the custard mixture into 4-6 ramekins (¾ full) and bake at 350°F for 25-30 minutes. For a crust, use mini graham cracker crusts or a quick cookie crumble. These make perfect single servings for dinner parties or personal treats. Store baked custards in the fridge for up to 3 days—they reheat beautifully in the microwave for 20-30 seconds.
What's the best way to store leftovers?
Store the pie in an airtight container in the fridge for up to 4 days. For longer storage, wrap tightly in plastic and freeze for 3 months. Thaw overnight in the fridge, then reheat at 350°F for 15 minutes** to restore creaminess. Avoid freezing with whipped cream toppings—add those fresh after reheating for the best texture.